How to Test Paint Colors the Right Way
A friend of a friend was sharing with me about how she was painting her living room a THIRD time herself because she didn’t like the colors that she had chosen. Her husband painted their living room the first two times but said he was done. I’m actually surprised he painted it twice. lol. A couple of clients came to me a couple of years who’s realtor picked the wrong white paint color for their house and both respective houses sat on the market for 4 months with no offer. (This was pre-pandemic of course.) I painted a bedroom in one of my AirBnB’s Chantilly Lace. I should have tested it but I didn’t. I figured how can you go wrong with Chantilly Lace? lol. Well, apparently you can. It was just too cold looking for my Beach House and the look I was trying to achieve.
If we’re all a bit honest with ourselves, choosing paint colors can be very time consuming, frustrating, and expensive if we have to pay for someone to repaint a room over. But it doesn’t have to be this way with proper testing. Yes, it may take you a bit longer to choose a color, but in the long run, its worth it when you’re happy with your choice the first time around.
There is alot to consider when choosing the right color for your house. There’s the style of your house, the elements in your room, the impact that lighting has in your space, both natural light and light fixtures (not to mention the types of bulbs that you have) and of course the undertones of the paint.
Read: How do I pick a paint color for my house?
5 Tips to testing & picking the right paint color
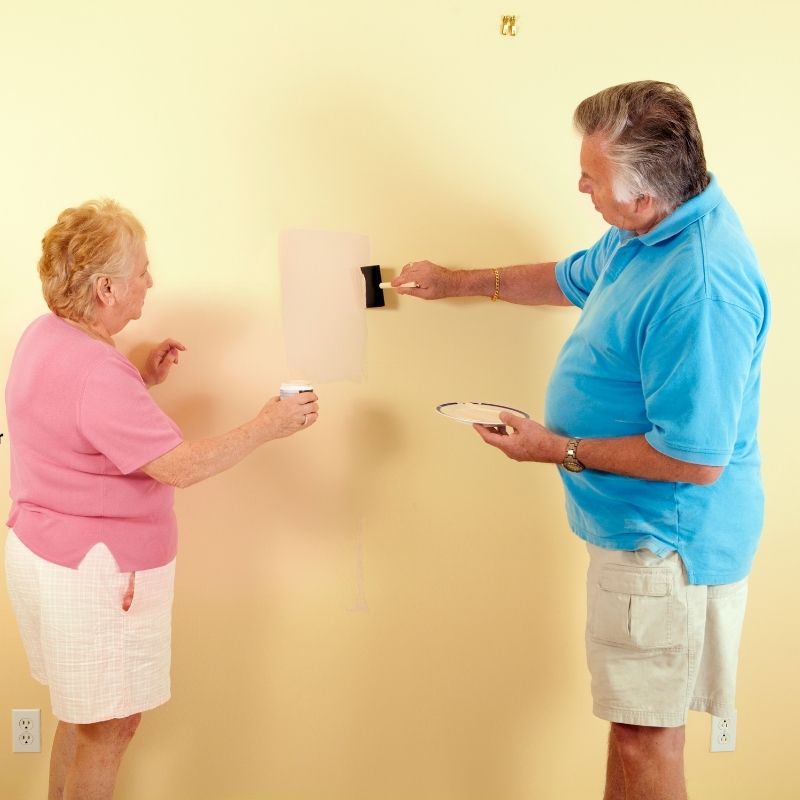
1. Buy or paint poster boards.
DON’T use a small paint chip! You need to use a large poster board to get a good feel of how your new color will look on the wall. You can purchase most sample paint color boards in 12″ x 12″. Or you can buy test pots and paint poster boards yourself.
Its best to use large boards so that you can see the undertones of each paint color side by side.
What the heck is an undertone?
Whenever a color is made by mixing two or more colors together, the “mixed” color will have both a mass tone and an undertone. The mass tone is what you see first. It’s the color red, blue, green etc. This is what you see on your wall. The undertone is harder by looking at a small example, but once its up in an entire room, you may see the color has a green undertone or a pink undertone for example. If people have chosen the wrong paint color for the wall, its typically because the undertone is the wrong color for the elements in the room i.e. flooring, countertops, furniture etc. Many years ago (before I studied color theory), I painted the basement family room “beige” not realizing it had a strong pink undertone until it was up on the walls.
The closer the undertone is to the mass tone, the truer the color will appear. The undertone of color may not be obvious, especially in neutrals. That’s why its so important to use large poster boards so that you can see the undertones and compare the colors to the room’s elements.
To really get a feel of the undertones of a color, place 3 of your sample boards, side by side against a wall. You will be able to see the difference among the colors even slight variations. These are the undertones.
2. Always test your boards during the day on a sunny but not too sunny day
Light has a huge impact on the color of the room. Not only natural light, but artificial light as well. The direction that your room faces also impacts the way your color looks. For example, if you have a north facing room, the amount and type of daylight you see in your room will be a totally different experience than if you have an east facing room. One client of mine actually liked her room in the evening better than during the daytime because its looked cozier in the evening and cool during the day.
3. Compare your colors together on a white background!
Its best to test the samples against white paper as opposed to your current walls to get a more accurate picture of what the new color will look like. Testing against the current paint color, will distract you from seeing the true color of the samples. Compare the 2 – 3 samples that you have narrowed it down to side by side to compare them against each other.
If you’re testing neutrals, its always a good idea to test them against a stark white poster board for comparisons. This way you will be able to tell what the undertones are in the neutral.
4. Move the poster boards around the room on many walls!
Test the sample on the lower part of the wall against the baseboard, high on the wall below the ceiling, on different walls where the sunlight or lack thereof will show the paint color in a different light (pun not intended.) Its important, especially with neutral whites, to test your colors on a wall that is beside alot of windows.
White in particular, can reflect the colors of what’s going on outside. For example, the green trees can make a white wall appear greenish from the reflections. And the most important test, is to test your samples against the fixed elements in your room like the flooring, countertops etc. I was recently in a client’s kitchen who wanted to repaint her kitchen cabinets. Her floors where a stunning cool white tile with slight patterns of a light cool gray, her countertops where black, but her kitchen cabinets were a warm white which almost looked like a light beige against the cool colors of the fixed elements. Her cabinets were the wrong color and it showed. Her kitchen cabinets would look much better picking up the cool white from the floor tiles, and perhaps paint the lower cabinets or the kitchen island the pretty light gray that was in the tiles.
5. Test your final choice on the wall using paint
Once you have narrowed down your choice to one (or maybe two) colors, now is the time for the real test. You need to test the actual type of paint and sheen that you will use on your walls.
This is the only way to truly test a paint color without painting an entire room. Be sure to prepare the wall properly first, by cleaning the wall, and painting it with primer if you’re going from a dark color to a lighter one. Be sure to paint TWO coats of paint to see what the real color will look like. Painting with one coat doesn’t give you the true color of the paint.
You need to paint a large portion of a wall, approximately 5′ x 5′ to get a good look of what the actual color will look like in your room.
Wondering how to pick the perfect paint color?
I have a great solution for you! Samplize sells 12×12 stick on paint squares in almost every paint color. These eco-friendly, peel and stick squares are made from real paint, so they will show you exactly what the paint color will look like. Samplize squares are able to be placed on your wall and peel right off when you’re done. You can move these paint squares around your room to easily tell whether a color will go in your home, with your furnishings and accents, and with your lighting.
Hate your current paint color?
I can help you with that!
I help busy homeowners, just like you, to style their house to make it a stunning retreat, where they can live and enjoy their home.
I can help you choose colors for your home or exterior that will co-ordinate with your existing features and give you a color that you will love.
I can help you come up with a design plan for a room taking all the guesswork and stress away from you
Learn more about my online color, design & staging consults here.
Hi! I’m Debi Collinson. Designer. Color Consultant. Real Estate Investor.
— My design advise to the world is … styling your home is the BIG secret in having an Instagram worthy home as opposed to a ho hum look.
— My superpower is about styling to make your home stunning all while adding value to your home at the same time!
I conducted my first color consult at the age of 7. lol. I grew up looking at blue prints and helping my dad, an Engineer|General Contractor and owner of a Design|Build|Engineering firm pick out paint colors for his buildings.
In 2006, I staged my very first house. Staging was just starting to become known in the real estate industry. There was no formal staging training at that time so I watched every HGTV show on staging that I could find as I nervously staged my first house. The couple liked their newly “redesigned” home so much that they turned down an offer for full asking price and decided not to move. The rest, as they say, is history. I went back to school to study interior decorating and design. My design & staging firm is recognized for helping clients achieve their dreams either through designing their space, or helping them achieve top dollar by staging their home when they’re ready to sell.
In my spare time, LOL, I buy “fixer uppers” to fix up & either sell for a healthy profit or to rent. I’m currently looking for my 10th “fixer upper.” Sign up to receive my e-mails of how to make your home stunning, how to sell your house for top dollar AND how to become financially independent one fixer upper at a time! Read my full story including my design credentials here.